The
GSXRD400 Project
I love the RD400 engine but I don't
really like the stock chassis..
Thus was born the GSxRD400 project.
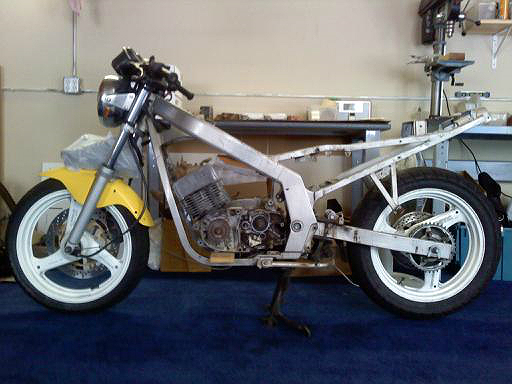
Suzuki made the GS500 from 1989 to about 2009 with 37mm forks, monoshock
suspension, 17inch wheels, and a steel
box section perimeter frame. The chassis
handles great but they came with a fourstroke 500cc twin. They handle great,
it was designed for a twin, their easy to find, affordable, and easy to modify.
So I bought
one for 300 with a "seized" engine.
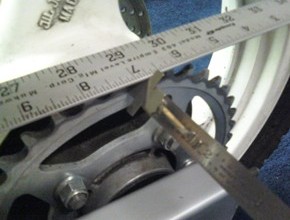
After taking some front sprocket
location measurements
I pulled the engine and slid an RD350 engine in to see if it looked possible.
Now to find a donor engine and make some engine mounts.
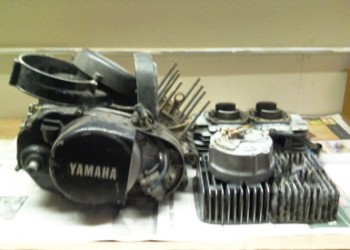
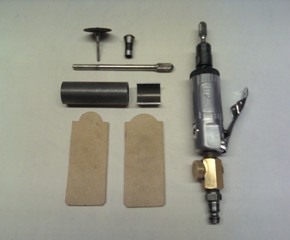
Never has a grungy pile of engine parts looked so lovely.
My good friend Steve Turner donated a rebuildable 400 engine to me.
Thanks again Steve!
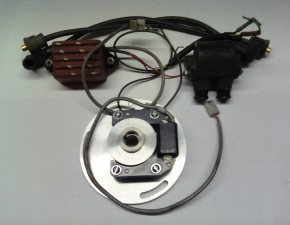
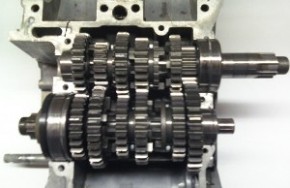
Good News/Bad News..
Good news: My friend RDjeff sold me an old ProFlo ignition for very fair price.
Bad News: I split my cases and need at least 3 gears.. 2nd gear is even missing
a tooth..
Good News
Because I carefully removed the rear lower engine mounts I was able to relocate
and reuse them.
I'll have to fabricate the other mounts but it sure is nice when you can reuse
some of the brackets.
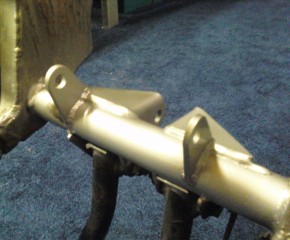  Getting
the rear lower mount done was priority #1 so that I could get the sprocket
positioning just right. Now on to the front mounts. I’m using 5/32 particle board to make my temples
because I have it laying around and it works great. Because RD250s and 350s had solid mounts I used a set of 250
cases to set the front bolt spacing, I needed to use the 400 cases when I was working out the rear
mount because the 400 needs just a hair more frame tube clearance in the rear (and to make sure the
cylinders and heads cleared the front frame tubes in the front) but I’ll have the front mounts welded in place with
the 250 cases in place so that I can use this bike as a test mule. I don’t have a lot of chassis’ laying
around anymore so this will let me run a 250, 350, or 400 engine in this bike if I want to run to the dyno or spend some time
developing something new.
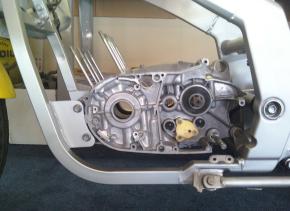
The
front mounts were really a piece of cake, I bought some 3/16 plate, cut it to
match
my templates and had them welded in. The major work is done!! I’ll save doing
the upper
rear mount for later it’s not a super supportive part of the mounting system.
We used to run
these engines without the upper mount all the time. I’ll keep an eye out for
someone scrapping
an RD400 frame and cut the upper mount off to adapt to this frame to save some
fabricating.
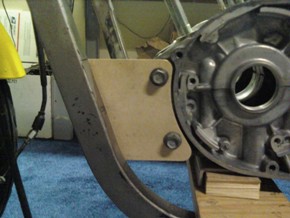
Notching the frame
It's not as bad as it sounds. I had to notch the frame on the left side to be
able to get the rear engine mount bolt in & out and on the right to clear the rear side cover bolt. Once you
determine how big the cut out has to be add a 1/8 to that and cut it out, use a template to make sure it's
the same all the way across. Next cut some thin wall tubing to width and length, trial fit it to make sure
everything is going to clear and weld it in. If the arc of the tubing is a bit large pinch it a bit in a vise, if the
arc is not quite large enough flatten it out a bit.
Sprocket Offset
Sprocket Offset does NOT have to be Rocket Science!
Basically if you mounted your engine straight you are just going to align your
rear wheel in the swingarm and measure the difference between the two sprockets.
The cheapest way to do this is
with one of those cheap aluminum yardsticks you can buy at home depot.
They’re cheap, they’re straight, you can notch them if you’ve got to
clear a frame tube or something, and they’re long enough. What your
looking to do is rest your “straight edge” against two points on one
of the sprockets or one of the mounting surfaces for one of the sprockets,
that puts your straight edge at 90deg to that shaft or axle giving you
your desired perfect sprocket alignment. Now it’s just a matter of
measuring how much the difference is between the sprockets (or sprocket
mounting surfaces). Here’s my example: On this bike it was easier for me
to align my straight edge on the from sprocket mounting surface then with
the straight edge in perfect alignment but resting on top of the rear
sprocket I just measured the difference between the sprockets outer
surface the outer edge of the straight edge this measurement was ¼” so
I subtracted that from the width of the straight edge which is 1 1/8”
giving me 7/8” then I subtracted the width of the 520 rear sprocket
(1/4”) which gave me my offset. I need 5/8” offset. I’ll use a ½”
offset front sprocket with an 1/8” spacer behind the sprocket and Bingo!
Though if you have enough tire clearance you could always machine the rear
sprocket mounting surface down and not use as much front sprocket offset,
however you want to do it as long as it adds up to the proper offset and
still clears the tire you want to use.
With the engine done it's time to mount the pipes..
Modifying
the Pipes..
Of course they don’t make an off the shelf set of pipes for a GSxRD.. But my old
friend Doug Johnson over at MotoCarerra was very very very kind to donate a set of his
awesome RD400 Millennium GP pipes for the project. The MotoCararra Millenium GP
pipes are really an awesome pipe, good strong power down low but excellent top
end power as well. To mount a set of pipes on a bike they weren't made for is basically
first just a matter of mounting the flanges and seeing how they fit.. in this case I needed more downward angle
just to get them to bolt up and then more inward angle to get the outlets where
I wanted them to exit. So I carefully cut the slip fit sections off the end of
the headpipes and trimmed them just a bit until they lined up holding the pipes
up with blocks of wood and smaller 1/2-3/4” blocks between the pipe and things
I didn’t want the pipes to be rubbing against, the frame, the chain ect ect..
Once I had it right I tacked it in place and moved on to the rear mounts, after
the rear mounts it’s just a matter of getting the right bend to the stingers,
and the silencers. I used Toomey silencers to try to keep the noise down but I
think I’m going to fabricate a set of my own silencers later to try to bring the
sound level down a just a bit further.
There
are a lot of people I’d like to thank for their help on this project. Doug
Johnson at MotoCarrera, John at Economy Cycle, Brain Capps, Steve Turner, Garrett
Amner, Tom Mackie,
Gabriel Clift and Ralph Ponce as
well as several others in the RD, RZ and GS500 community that I’m sure I’m
forgetting. Thanks Guys!
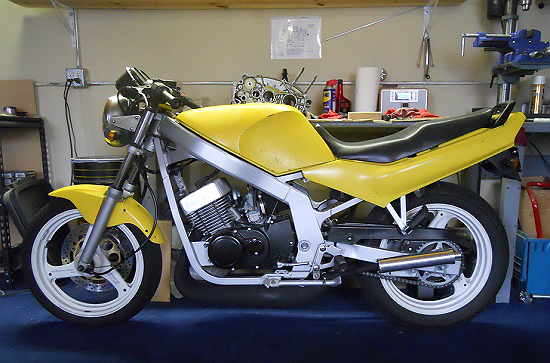
Having
finished the bike and riding it now I can say it came out great. It rips like an
RD and handles like a sportbike.. imagine that.. sweet!!
|